[Review] Boox Poke 4 Lite eReader: Dilemma Between Open & Closed
Inori
import TranslationNotAvailable from ’../../../../components/TranslationNotAvailable.astro’;
import TranslationNotAvailable from ’../../../../components/TranslationNotAvailable.astro’;
Basic Knowledge:
CSS,HTML,JS,React
Tailwind provide dark mode to set dark theme style individually by adding keyword dark: in front of any CSS class:
<div class="text-black dark:text-white"> {/* ... */}</div>If we want to make a theme switcher, it seems feasible by using dark:. But it will be restricted to only TWO themes. Another disadvantage is, since we use dark: syntax in CSS class on HTML elements, we have to add all of it no matter where the theme is.
For who want to skip all only to see the final result & source code, please go here.
As Tailwind provides custom color in its config file:
module.exports = { theme: { colors: { primary: "#0d6efd", secondary: "#6c757d", danger: "#dc3545", warning: "#ffc107", }, },};PS. The color above is referred to Bootstrap color palette.
Suppose we had two themes, config might be looked like this:
module.exports = { theme: { colors: { "theme-1-primary": "#0d6efd", "theme-1-secondary": "#6c757d", "theme-1-danger": "#dc3545", "theme-1-warning": "#ffc107", "theme-2-primary": "#0d6efd", "theme-2-secondary": "#6c757d", "theme-2-danger": "#dc3545", "theme-2-warning": "#ffc107", }, },};Therefore, we can change class by what current theme is:
function Button() { const buttonTheme = isTheme1 ? 'bg-theme-1-primary' : 'bg-theme-2-primary';
return <button className={buttonTheme}>;}But thinking of write the logic EVERYWHERE relate to theme, it’s not a smart way. In addition, if we had four or five themes, it could not be written with one-liner. We might have bunch of switch cases.
With CCS variables (or custom properties), we can define variables in CSS. The CSS variables can be divided into two parts: global & scope variables.
Here’s how to define CSS scope variavble:
element { --main-bg-color: brown;}The variable --main-bg-color can only be used in THIS scope. (namely, THIS curly brackets {})
The more common way is to define variables in pseudo-class :root, all variables in here can be used under HTML document, namely global variables.
:root { --main-bg-color: brown;}When using CSS variables, calling var() function with variable name as argument:
element { background-color: var(--main-bg-color);}Combining Tailwind and CSS variables, we can achieve theme switching. We just modified the config a little bit by replacing color code with CSS variables, like this:
module.exports = { theme: { colors: { 'color-one': 'var(--color-one)', 'color-two': 'var(--color-two)', 'color-three': 'var(--color-three)', 'color-four': 'var(--color-four)', 'color-five': 'var(--color-five)', }, }}As we’ve done with Tailwind config, another part is defining each theme palette, along with their global variables.
const theme_ayanami = ` :root { --color-one: #1d446c; --color-two: #f1f1f1; --color-three: #571a1a; --color-four: #000000; --color-five: #525252; }`;
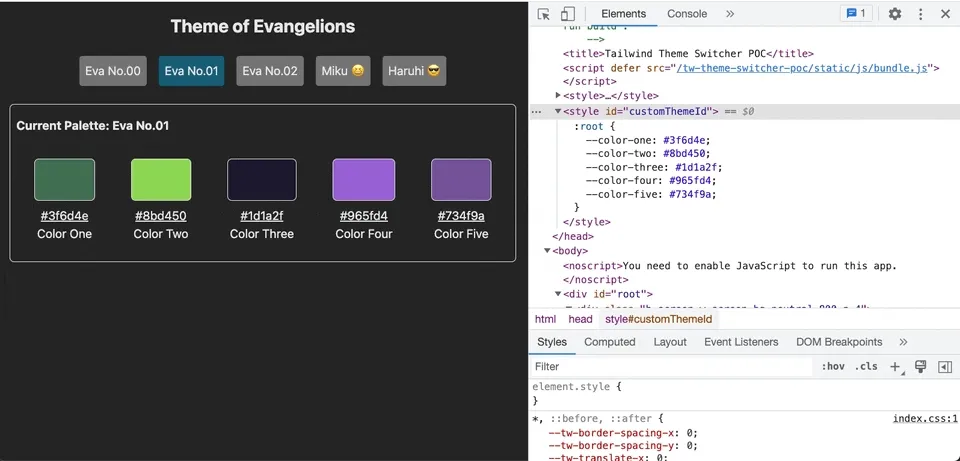
const theme_ikari = ` :root { --color-one: #3f6d4e; --color-two: #8bd450; --color-three: #1d1a2f; --color-four: #965fd4; --color-five: #734f9a; }`;After wrapping theme variables in <style>, we implant it into <head>.
function App() { const [currentTheme, setCurrentTheme] = useState("ayanami");
const getThemeVariables = (_theme) => { switch (_theme) { case "ayanami": return theme_ayanami; break; case "ikari": return theme_ikari; break; } };
useEffect(() => { if (!document.getElementById("customThemeId")) { const head = document.head; const newStyleElement = document.createElement("style");
head.appendChild(newStyleElement); newStyleElement.id = "customThemeId"; newStyleElement.innerHTML = getThemeVariables(currentTheme); } else { const styleElement = document.getElementById("customThemeId");
if (styleElement) { // Update CSS gloabal variables styleElement.innerHTML = getThemeVariables(currentTheme); } } }, [currentTheme]);
return ( <div> <button onClick={() => setCurrentTheme("ayanami")}>Ayanami</button> <button onClick={() => setCurrentTheme("ikari")}>Ikari</button> </div> );}Here we define two themes, Eva.00 and Eva.01. After that, we can use the custom class we defined:
<div class="bg-color-one"></div>Through modifying the content in <style>, we can overwrite old theme color palette with new one. Then we can change theme!
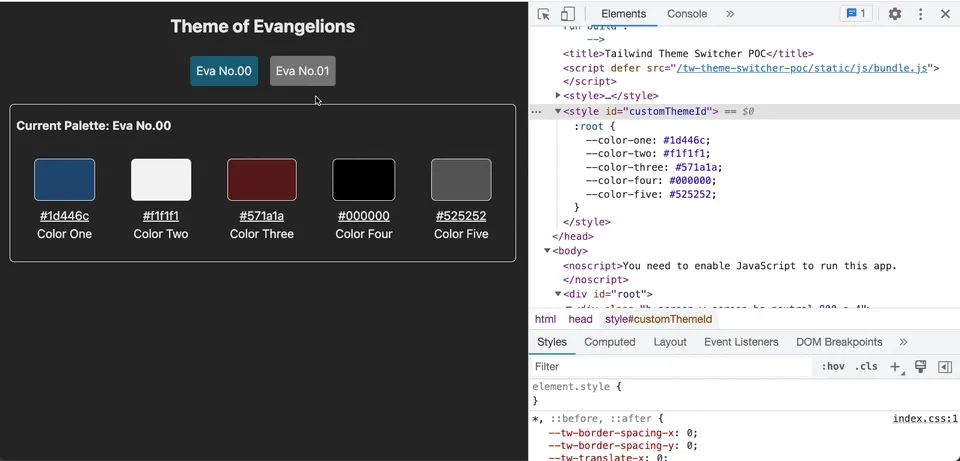
As checking dev tools of browser, we can find that only global variables change, everything inside the <body> will remain unchanged.
Encore! Here are another two theme! Hatsune Miku and Suzumiya Haruhi themes! 😘
For seeing final result, please go to here.
For all source code, please refer to here.
As we change theme, we don’t have to modify any line of code in HTML, CSS class. Also theme change logic is now unnecessary in any component.
Every color theme variables set is just a string, ready to implant into <style>.
In the exmample above, I just simply place them in JS files.
When it comes to updating theme or adding new theme, we still have to build all front-end project every time.
To prevent this, we have to consider it further in CI/CD structure and strategy.
Since I’m not familiar with CI/CD, so I don’t discuss it here.
I would be glad to hear if anyone who had a better solution to integrate it with CI/CD pipeline.
Have a nice day and happy coding. 😎
Here’s a little side note from Chapter 6 - Multithreaded Patterns in this book: Multithreaded JavaScript.
In this chapter, introducing some multi-threaded patterns:
libuv library that Node.js depends on provides a thread pool, defaulting to four threads, for performing low-level I/O operations.libuv)// browsercores = navigator.hardwareConcurrency;
cores = require("os").cpus().length;n + 1Here’s a list of the most common strategies:
roundrobin.leastconn.head index: The head index refers to the next position to add data into the queue.tail index: The tail index refers to the next position to read data out of the queue from.Refer to the chart from the book:

head index will move to the next position.tail index will move to the next position.tail index at the last position of buffer, next will move the the first position of buffer.head and tail index does not matter.tail index is always located behind or at the same position with head index.Refer to wikis:
tcp://127.0.0.1:1234/3 might refer to the third actor running in a program on the local computer listening on port 1234.Refer to the chart from the book:

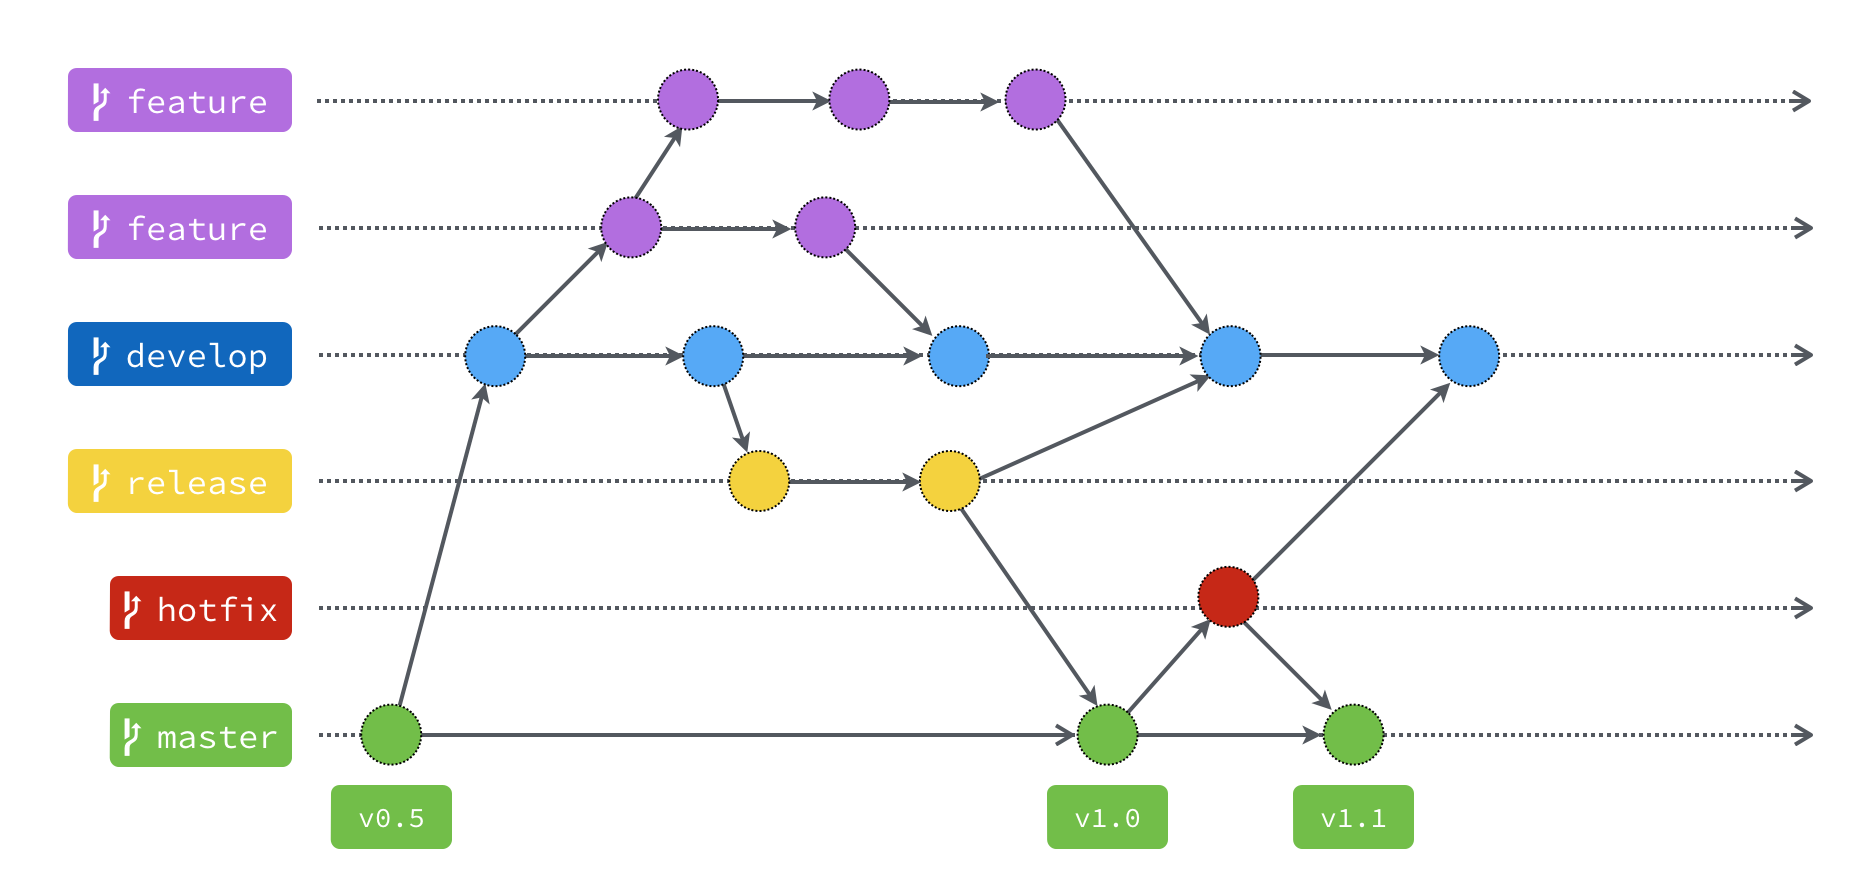
I’ve upgraded my blog theme recently. In my best practice in development process, I prefer using gitflow to manage the code. It is one of popular version control workflow on the planet. And the FLOW looks like this:
In almost one year, I am always git push my posts on main branch.
But before I start upgraded my theme, I git checkout to develop branch.
According to the chart above, when we want to add some new feature, we create a FEATURE branch from develop branch.
After finishing it, we merge the feature branch into develop branch.
But how to bring my new feature deploying to my blog? (in here means main branch)
We have to create a RELEASE branch, then close it, merging it into bothdevelop branch AND main branch.
Release branch seems meaningless here, because it is used as testing the feature from QAs.
Since this is my personal project, so release branch does not do anything.
I just follow the gitflow.
In main branch, there is only one way to update new code: from release branch.
But in my blog here, it might be pain.
I am wandering, what if I created every post at develop branch, then must do tedious create-branch-merge-branch process every time I want to publish my new post.
From the beginning, I insisted on doing the right gitflow process. But now I must compromise. “That’s not practical.” I told to myself. So the conclusion is, I have decided do this into two parts.
First, creating posts will remain on main branch directly, for the sake of convenience.
Second, other things will doing it on develop or feature branch.
Something like updating blog config, making some change with folder structure, trying modified the theme, …etc.
I think it is good to go.
Cheers.