Skip to content
About Garden

Blog

Create Hugo Post With NPM Script

  • Basic knowledge: NPM, Hugo, JavaScript, shell script
  • Pre-installed: VS Code, NPM CLI, Hugo CLI

Create a post using hugo CLI is a tedious work for me. Because I always create a post using archetype and placing it in nested folder. For example, when creating this post, I should type the command below in the terminal:

Terminal window
hugo new --kind develop posts/_developer/create-hugo-post-with-npm-script

The problem here is, I always forget how many kind of archetypes I already have, and what my folder structure looks like right now. Folder structure can be dynamic, can be adjusted very frequently. Furthermore, I really like the NPM SCRIPTS feature that VSCode provided at Explorer in side menu, screenshot shown below:

npm script in side menu

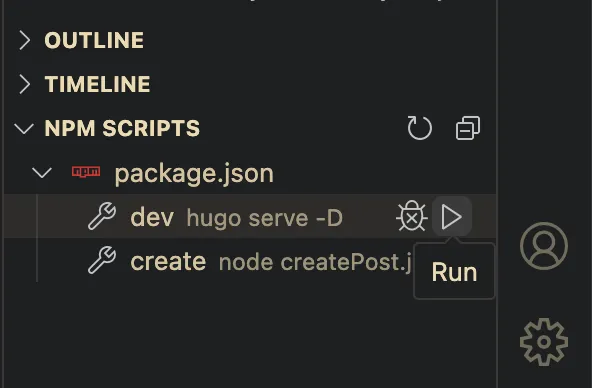
This feature, which I call it click to run script personally, is very convenient if the user can not memorize or forget scripts. But it seems to support node pack manager a.k.a NPM as far as I know. In order to using the “click to run script” feature combining with Hugo CLI, it is necessary to using NPM as a middleware, even though Hugo blog does not need NPM or any node packages at any time. So here we get start it.

First initialize NPM with npm init.

Then let’s try running hugo dev server through NPM, after adding this script into your package.json:

package.json
"scripts": {
"dev": "hugo serve -D",
}

Type npm run dev in your terminal, or just click the script to run at side bar:

npm run dev

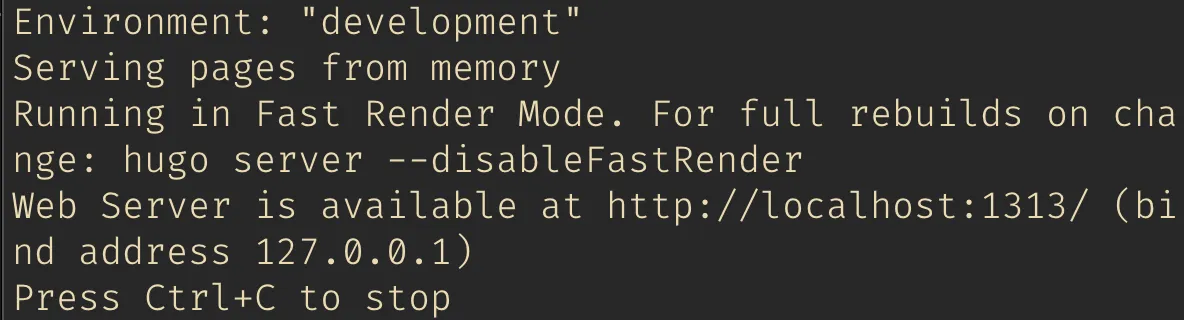
Work like a charm! ✨

So, NPM script called Hugo CLI perfectly. Then let’s trying to achieve final goal: create a post.

First we have to install two packages:

  1. @inquirer/prompts, which is used to make user-friendly interface in our terminal.
  2. inquirer-directory, make choose directory easier.

Then I create a JavaScript file createPost.js in root directory, build the post creation progress, here’s the code for your reference:

"use strict";
const inquirer = require("inquirer");
const { input, select, Separator, confirm } = require("@inquirer/prompts");
const { execSync } = require("child_process");
const inquirerDirectory = require("inquirer-directory");
const BASE_PATH = "./content";
inquirer.registerPrompt("directory", inquirerDirectory);
const exec = (commands) => {
execSync(commands, { stdio: "inherit", shell: true });
};
/**
* Create post script
*
* @see https://github.com/SBoudrias/Inquirer.js
* @see https://github.com/nicksrandall/inquirer-directory
*/
(async function () {
const archeType = await select({
message: "Select a archetype",
choices: [
{
name: "Basic",
value: "basic",
description: "Basic post",
},
{
name: "Dev",
value: "dev",
description: "Post for developer.",
},
new Separator(),
{
name: "Garden",
value: "garden",
description: "Note for digital garden.",
},
],
});
const title = await input({ message: "Enter your post title" });
const directory = await inquirer.prompt({
type: "directory",
name: "path",
message: "Please choose post directory.",
basePath: BASE_PATH,
});
const answer = await confirm({ message: "Confirm create the post?", default: false });
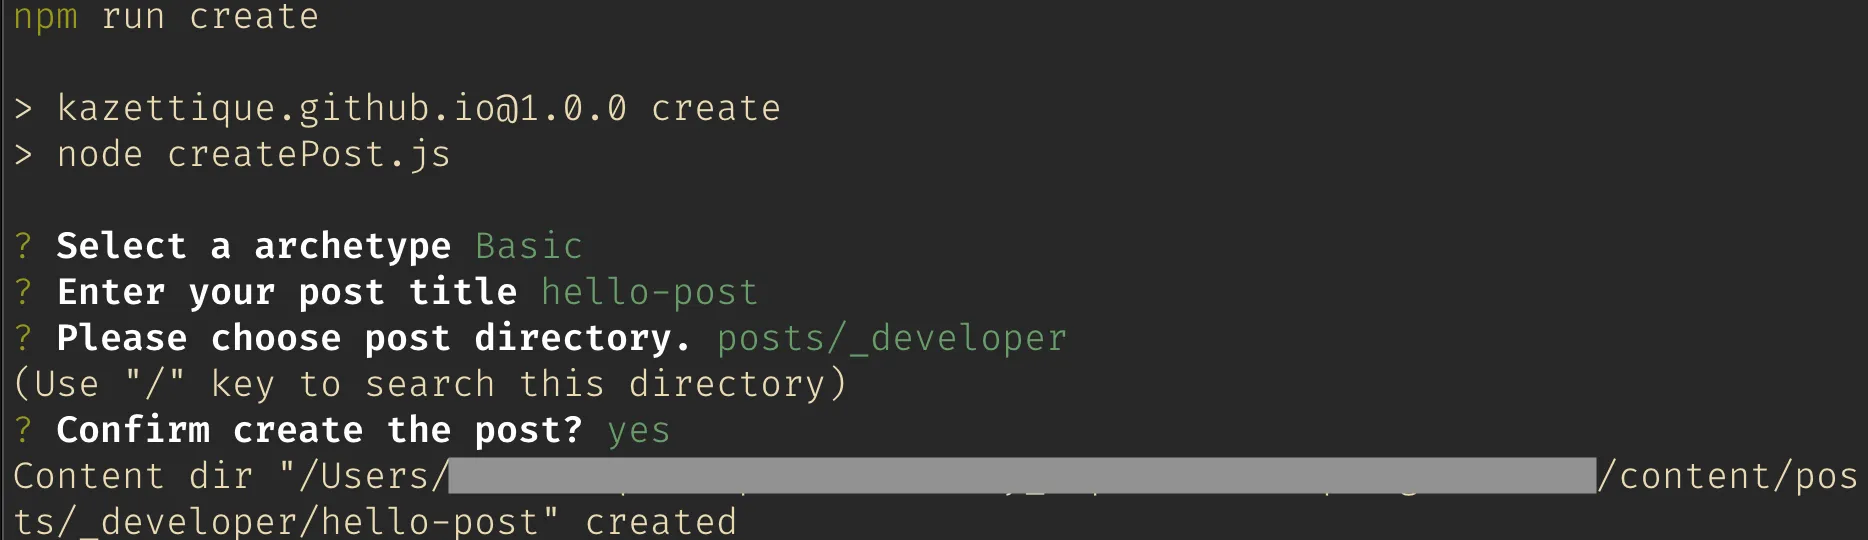
if (answer) {
exec(`hugo new --kind ${archeType} ${directory.path}/${title}`);
exec(`open ${BASE_PATH}/${directory.path}/${title}/index.md`);
}
})();

In the script , I provided 3 question, and some actions:

  1. Select a archetype.
  2. Insert post title.
  3. Choose a directory.
  4. Confirm the creation.
  5. Execute the hugo post creation script.
  6. Finally, open the file we created.

After finish your crafted script, then add this to our package.json:

package.json
"scripts": {
"create": "node createPost.js"
}

Then run npm run create, here’s the execution result:

npm run create

That’s it! Happy coding.

[Note] Implementation of State Machine and Multi-step Form

Basic knowledge: VueTypeScriptXStatevee-validatezod

We often see “multi-step” forms that break down a lengthy form into several separate sections for completion. This approach reduces the psychological burden on users compared to a single long-page form.

Among the numerous form-related open-source packages available, I’ve selected the following tools to manage form-related tasks:

  • Form state management: Using Vue for this example, vee-validate manages the rendering states of all form elements including input, select, and other form components
  • Form validation: For validation tasks, we use zod (officially recommended by vee-validate) to handle the validation logic

Now that we’ve covered the form components, the key question remains: how should we design this “multi-step” architecture?

If we combine all fields from each stage into a single form, as shown in the diagram:

When switching between stages, we need to determine which fields to display, but when moving to the next stage, we need to validate only the current set of fields, which leads to complex validation logic.

So I thought of making each stage an independent form, meaning all validation is no longer partial, but rather validates all fields within a form (for example, all fields in stage one):

By splitting into multiple forms, we’ve simplified the form validation logic, eliminating the need for additional checks (partial field validation). The responsibilities of each form component are as follows:

  1. Field state management
  2. All field validation

After delegating the above tasks to the form components, the remaining logic to handle is:

  1. Display the state of which stage form component is currently active
  2. Submit form data and execute asynchronous requests

Since “Stage One” can only proceed to “Stage Two” and not to “Stage Three” or “Confirmation Stage (Step Confirm)”, I thought of using a finite state machine to solve these two issues, and decided to try XState, a well-known package for implementing finite state machines, to handle these tasks.

Therefore, the responsibility distribution diagram is as follows:

The previous section outlined the initial ideas. Here, let’s organize the planned assignment of responsibilities, which is divided into two parts:

  1. Control flow between stages (determining which form to display at each stage)
  2. Management of all form data
  3. Data submission and asynchronous request handling
  4. Handling of asynchronous request states (loading and error handling)

All of these features are implemented using XState.

  1. Form field state management (using vee-validate)
  2. Form field validation (using zod)
  3. Form submission events and form data (using vee-validate)

For the form component, taking the first stage Form1.vue as an example, the structure is as follows:

<template>
<div>
<h2 class="formTitle">Choose channels you like</h2>
<form class="form" @submit="onSubmit">
<div>
<input type="checkbox" id="discovery" :value="1" v-model="channels" />
<label class="label" for="discovery">Discovery</label>
</div>
{/* other inputs... */}
<div v-if="errors.channels" class="error">{{ errors.channels }}</div>
<div class="buttonGroup">
<button class="button" type="submit">next step</button>
</div>
</form>
</div>
</template>
<script setup lang="ts">
import type { Form1Model } from "@/types";
import { toTypedSchema } from "@vee-validate/zod";
import { useForm, useField } from "vee-validate";
import z from "zod";
interface Props {
initialValues: Form1Model;
}
interface Emits {
(event: "next", values: Form1Model): void;
}
const props = withDefaults(defineProps<Props>(), {
class: "",
});
const emits = defineEmits<Emits>();
const validationSchema = toTypedSchema(
z.object({
channels: z.number().array().nonempty("Please choose at least one channel."),
})
);
const { handleSubmit, errors, values } = useForm<Form1Model>({
initialValues: props.initialValues,
validationSchema,
});
const { value: channels } = useField<number[]>("channels");
const onSubmit = handleSubmit((values) => emits("next", values));
</script>

The form’s initial values are provided by the state machine and passed in via props; then when the form is submitted, it emits events for the state machine to handle. One person is responsible for one thing, embodying the spirit of the “Single Responsibility Principle.”

The display control for forms at each stage is implemented in the outer MultiStepForm.vue, which imports the state machine and determines the display logic. Each form emits various events (next step, previous step, submit, etc.), which are then handed over to the state machine for execution.

<template>
<div :class="`h-full w-full ${props.class}`">
<h1 class="title">Multi Step Form Example</h1>
<div class="grid grid-cols-2 gap-x-6">
<div>
<h2 class="subTitle">Form Component</h2>
<div class="p-4 border border-slate-700 rounded-lg">
<Form1
v-if="state.matches('step1')"
@next="send('NEXT_TO_STEP_2', { formValues: $event })"
@prev="send('PREV')"
:initial-values="state.context.form1Values"
/>
<Form2
v-if="state.matches('step2')"
@next="send('NEXT_TO_STEP_3', { formValues: $event })"
@prev="send('PREV')"
:initial-values="state.context.form2Values"
/>
<Form3
v-if="state.matches('step3')"
@next="send('NEXT_TO_STEP_CONFIRM', { formValues: $event })"
@prev="send('PREV')"
:initial-values="state.context.form3Values"
/>
<FormConfirm
v-if="state.matches('stepConfirm')"
@prev="send('PREV')"
@submit="send('SUBMIT')"
:is-submitting="state.matches('stepConfirm.submitting')"
:error="state.context.error"
:machine-context="state.context"
:payload="state.context.payload"
/>
<FormComplete v-if="state.matches('complete')" @restart="send('RESTART')" />
</div>
</div>
<div>
<p class="subTitle">Current Machine Context</p>
<pre class="preBlock">{{ state.context }}</pre>
</div>
</div>
</div>
</template>
<script setup lang="ts">
import { useMachine } from "@xstate/vue";
import Form1 from "@/components/Form1.vue";
import Form2 from "@/components/Form2.vue";
import Form3 from "@/components/Form3.vue";
import FormConfirm from "@/components/FormConfirm.vue";
import FormComplete from "@/components/FormComplete.vue";
import { multiStepFormMachine } from "@/multiStepFormMachine";
interface Props {
class?: string;
}
interface Emits {
(event: "click"): void;
}
const props = withDefaults(defineProps<Props>(), {
class: "",
});
const emits = defineEmits<Emits>();
const { state, send } = useMachine(multiStepFormMachine);
</script>

Next is the state machine, which I’ve separated into a standalone file multiStepFormMachine.ts for easier management:

import { assign, createMachine } from "xstate";
import type { Form1Model, Form2Model, Form3Model, SubmitData } from "./types";
import { FORM_1_INITIAL_VALUES, FORM_2_INITIAL_VALUES, FORM_3_INITIAL_VALUES } from "./default";
import { sendFormData } from "./utils";
type MachineEvent =
| { type: "NEXT_TO_STEP_2"; formValues: Form1Model }
| { type: "NEXT_TO_STEP_3"; formValues: Form2Model }
| { type: "NEXT_TO_STEP_CONFIRM"; formValues: Form3Model }
| { type: "PREV" }
| { type: "SUBMIT" }
| { type: "RESTART" };
export type MachineContext = {
form1Values: Form1Model;
form2Values: Form2Model;
form3Values: Form3Model;
payload: SubmitData | null;
error: string | null;
};
const INITIAL_MACHINE_CONTEXT: MachineContext = {
form1Values: FORM_1_INITIAL_VALUES,
form2Values: FORM_2_INITIAL_VALUES,
form3Values: FORM_3_INITIAL_VALUES,
payload: null,
error: null,
};
type MachineState =
| { context: MachineContext; value: "step1" }
| { context: MachineContext; value: "step2" }
| { context: MachineContext; value: "step3" }
| { context: MachineContext; value: "stepConfirm" }
| { context: MachineContext; value: "stepConfirm.submitting" }
| { context: MachineContext; value: "complete" };
export const multiStepFormMachine = createMachine<MachineContext, MachineEvent, MachineState>(
{
id: "multiStepForm",
initial: "step1",
context: INITIAL_MACHINE_CONTEXT,
states: {
step1: {
on: {
NEXT_TO_STEP_2: {
target: "step2",
actions: assign({
form1Values: (context, event) => event.formValues,
}),
},
},
},
step2: {
on: {
NEXT_TO_STEP_3: {
target: "step3",
actions: assign({
form2Values: (context, event) => event.formValues,
}),
},
PREV: {
target: "step1",
},
},
},
step3: {
on: {
NEXT_TO_STEP_CONFIRM: {
target: "stepConfirm",
actions: assign({
form3Values: (context, event) => event.formValues,
}),
},
PREV: {
target: "step2",
},
},
},
stepConfirm: {
initial: "preSubmit",
states: {
preSubmit: {
entry: assign({
payload: (context, event) => ({
...context.form1Values,
...context.form2Values,
...context.form3Values,
}),
}),
on: {
SUBMIT: {
target: "submitting",
},
},
},
submitting: {
invoke: {
src: "formSubmit",
onDone: {
target: "#multiStepForm.complete",
actions: "resetContext",
},
onError: {
target: "errored",
actions: assign({
error: (context, event) => event.data.error,
}),
},
},
},
errored: {
on: {
SUBMIT: {
target: "submitting",
},
},
},
},
on: {
PREV: {
target: "step3",
},
},
},
complete: {
entry: "resetContext",
on: {
RESTART: {
target: "step1",
},
},
},
},
},
{
actions: {
resetContext: assign(INITIAL_MACHINE_CONTEXT),
},
services: {
formSubmit: async (context, event) => {
if (context.payload) {
return await sendFormData(context.payload);
} else {
return await new Promise((resolve, reject) => reject("Context cannot be null."));
}
},
},
}
);

For details of the state machine’s operation flow, please refer to this visualization page: multi-step-form | Stately

Above is the state machine code - Sorry for too lengthy. 🙏

The main responsibilities:

  1. Form1 emits a NEXT_TO_STEP_2 event to proceed to Form2, or Form2 emits a PREV event to return to Form1, and so on.
  2. FormConfirm emits a SUBMIT event to tell the state machine to execute an asynchronous request, sending out the form data.
  3. The state machine’s context stores the field data for Form1 and other form components, as well as the payload for the final request submission, along with the status of asynchronous requests (loading, error)

Below are the final implementation results, with form components on the left and the current context status on the right, clearly showing when the context data gets updated

Page

Please refer to here for all code

Above are some ideas for multi-stage forms, using state machines to achieve single responsibility for forms while clearly separating and delegating logic to different parts.

This is my first time seriously writing a state machine on my own, and I’m still in the learning and exploration phase. If you have any questions, feel free to leave a comment. 😎

Happy coding. 🙏

[Hugo] Deploy Hugo To Vercel With GitHub Actions

Basic knowledge: Hugoshellnpmgit

I deployed my blog on GitHub Page formerly, a platform for static site providing by GitHub. But GitHub Page has some limitation when we are using free account, like we should keep our repository public. However, I want to set my blog repository as private. Since I have some draft post on it. Another reason is I do not want to expose all my blog content to public like an open source. I did some research for some static site hosting platform. Then here comes two platform I am interest in: Deno and Vercel. And here I just wrote it down as a note about what I did, problems I faced.

Vercel is a well known deployment platform of front end application. It is also recommended on Next.js official documentation. Vercel provides one-click deployment feature with zero configuration, but this time I want to deploy it by my own with GitHub Actions and its workflow.

I found an article about this topic, it is written by an engineer from Ukraine called Oleh Andrushko. He wrote it well, but I faced some issues. So I just write it down here as a note.

  • Install Vercel CLI at local
  • Log in Vercel CLI
  • Prepare three secret keys for Vercel (Vercel account token, Vercel organization Id, project Id)

Install Vercel CLI & Sign In Vercel Account

Section titled “Install Vercel CLI & Sign In Vercel Account”

First, we install Vercel CLI GLOBALLY with NPM:

Terminal window
npm i -g vercel

Then open terminal (or cmd on Windows), type vercel, it might popup login request message:

Terminal window
vercel
Vercel CLI 28.10.1
> > No existing credentials found. Please log in:
> Log in to Vercel (Use arrow keys)
Continue with GitHub
Continue with GitLab
Continue with Bitbucket
Continue with Email
Continue with SAML Single Sign-On
─────────────────────────────────
Cancel

Here we choose log in Vercel with GitHub account:

Terminal window
> Log in to Vercel github
> Please visit the following URL in your web browser:
> Success! GitHub authentication complete for "<Your Email when logging-in GitHub>"
? You are deploying your home directory. Do you want to continue? [y/N] n

In the end, it asks us whether to deploy home directory, actually we don’t. So choose n.

Accessing into the project folder we want to deploy, then type vercel command again:

Terminal window
vercel
Vercel CLI 28.10.1
? Set up and deploy "<Your repo directory at local>"? [Y/n] y
? Which scope do you want to deploy to? "<Your GitHub name>"
? Link to existing project? [y/N] n
? What’s your project’s name? "<Your GitHub account name>"
? In which directory is your code located? ./
Auto-detected Project Settings (Hugo):
- Build Command: hugo -D --gc
- Development Command: hugo server -D -w -p $PORT
- Install Command: None
- Output Directory: `public` or `publishDir` from the `config` file
? Want to modify these settings? [y/N] n
Deploying "<Your Vercel account name>/<Your project name>"
🔗 Linked to "<Your Vercel account name>/<Your project name>" (created .vercel and added it to .gitignore)
🔍 Inspect: "<Vercel deployment project link>" [2s]
Preview: "<Vercel preview deployment link>" [10s]
📝 To deploy to production (hugo-test-navy.vercel.app), run `vercel --prod`

After that, we should find a folder named .vercel in our project. The folder has two files: project.json and README.txt respectively. Open project.json we will find:

{
"projectId": "<Vercel project Id>",
"orgId": "<Vercel organization Id>"
}

For now, we’ve got two secret keys: Vercel organization Id and Vercel project Id.

These two keys should be keep in the save place. When we ran vercel command, there are already added in .gitignore list. Further information can be found in README.txt.

For the third secret key, we have to go to Vercel’s dashboard to create it manually. Go to Tokens > Account > Dashboard > Vercel, create one for connection between GitHub and Vercel.

Go to our project page on GitHub, then head to actions secrets settings: repo > Settings > Secrets > Actions. Then click “New repository secret” button, adding three keys into it. (Here’s the link if you can not find it: https://github.com/<Your GitHub account>/<Your repo name>/settings/secrets/actions)

In project folder, creating a GitHub actions workflow file: /.github/workflows/vercel-prod.yaml (File name can be anything we like.)

Referring to Oleh’s config, modify it for my own. Here’s the whole workflow: GitHub Actions for Vercel Deployment

Since we want to use GitHub actions workflow to do deployment job, we have to override Vercel built-in auto deployment feature.

Following document from vercel-action, go to project setting page on Vercel: repo > Settings > General. In “Build & Development Settings”, Framework Preset is automatically detection by default. There’s no doubt our framework is Hugo. We change it to “Other”, then click Override button on the right of “BUILD COMMAND”, keeping the input as empty. Then save it. (If Vercel prevent you to save it, adding a whitespace can fix it.) As shown below:

Error message in GitHub actions console:

Terminal window
Error: No Output Directory named "public" found after the Build completed. You can configure the Output Directory in your Project Settings.

According to Oleh’s workflow file, he set working-directory as public, but this got me error:

- name: Deploy to Vercel
uses: amondnet/vercel-action@v20
id: vercel-action
with:
vercel-token: ${{ secrets.VERCEL_TOKEN }}
vercel-org-id: ${{ secrets.VERCEL_ORG_ID }}
vercel-project-id: ${{ secrets.VERCEL_PROJECT_ID }}
github-comment: false
vercel-args: --prod
working-directory: public # This line got error.

I removed this line, use root as working directory, then everything works fine.

Error message in GitHub actions console:

Terminal window
Error: Input required and not supplied: env
at getInput

Adding env variable:

- name: Update Deployment Status
uses: bobheadxi/deployments@v1
if: always()
with:
step: finish
token: ${{ secrets.GITHUB_TOKEN }}
status: ${{ job.status }}
env: ${{ steps.deployment.outputs.env }} # Adding env variable.
deployment_id: ${{ steps.deployment.outputs.deployment_id }}
env_url: ${{ steps.vercel-action.outputs.preview-url }}

Error message in GitHub actions console:

Terminal window
vercel-production
Node.js 12 actions are deprecated. For more information see: https://github.blog/changelog/2022-09-22-github-actions-all-actions-will-begin-running-on-node16-instead-of-node12/. Please update the following actions to use Node.js 16: amondnet/vercel-action@v20

This kind of message is just a warning, it does not block us from deployment. But we should keep in mind. Old version of Node will not work in the future. Updating the GitHub actions runner to latest version, then the warning message will disappear.

So, that’s all. We finish all deployment workflow! It will run automatically later when we push any code into main branch.

As I mentioned at the beginning, I did some research for deployment platform. Vercel and Deno are in my wishlist, and I decided to use Vercel. Vercel provides two deployment environment: production and review. So we can prepare two GitHubs Actions workflow separately for deploying develop and main branch. I set up workflows for two branches, but finally disable the preview part. As I write posts on main branch and push it to remote directly. 1 Since there’s front matter in markdown meta, deployment will ignore building markdown files with setting draft: true in markdown front matter. As it is similar between production and preview deployment workflow (difference like branch name), you can also take a look in Ukraine guy’s post if necessary.

By the way, maybe I will take a note about deploying hugo blog on Deno.

  1. When talking about Git flow for blogging workflow, I wrote about a short post about it: GitFlow & Blog Version Control